
How to Create Custom 3D Printed Prototypes: A Step-by-Step Guide
Creating custom 3D printed prototypes is the most efficient way to transform a conceptual sketch into a physical, functional reality. This process involves digital modeling, selecting the right additive manufacturing technology, and refining the physical object through iterative testing to ensure it meets engineering and aesthetic standards before mass production begins.
The journey from a "napkin sketch" to a market-ready product is often paved with trial and error. In the modern manufacturing landscape, speed is the ultimate competitive advantage. Whether you are a solo inventor or part of a global engineering team, understanding how to leverage high-fidelity 3D printing allows you to fail fast and succeed sooner. At Sunon Mould, we have seen firsthand how a well-executed prototype can save tens of thousands of dollars in potential tooling mistakes. By following a structured approach, you ensure that every iteration brings you closer to a flawless final product.

Why are custom 3D printed prototypes essential for product development?
Custom 3D printed prototypes are essential because they provide a low-risk environment to validate form, fit, and function before investing in expensive tooling. They allow engineers to identify design flaws early, reduce time-to-market by up to 70%, and facilitate clear communication between stakeholders, investors, and manufacturing partners.
In the past, creating a single prototype required complex machinery or hand-carving, which took weeks. Today, 3D printing services enable us to produce complex geometries that were previously impossible. This capability is not just about making a "cool model." It is about rigorous testing. For example, if you are designing a handheld medical device, a 3D print allows you to test the ergonomics—how it fits in a human hand—long before you commit to low-volume injection molding.
Tip: Always use your prototype to solve the "unknown unknowns." If you aren't sure how a snap-fit joint will perform, print three different versions of that joint in a single batch to compare them side-by-side.
What is the first step in the 3D printing prototyping process?
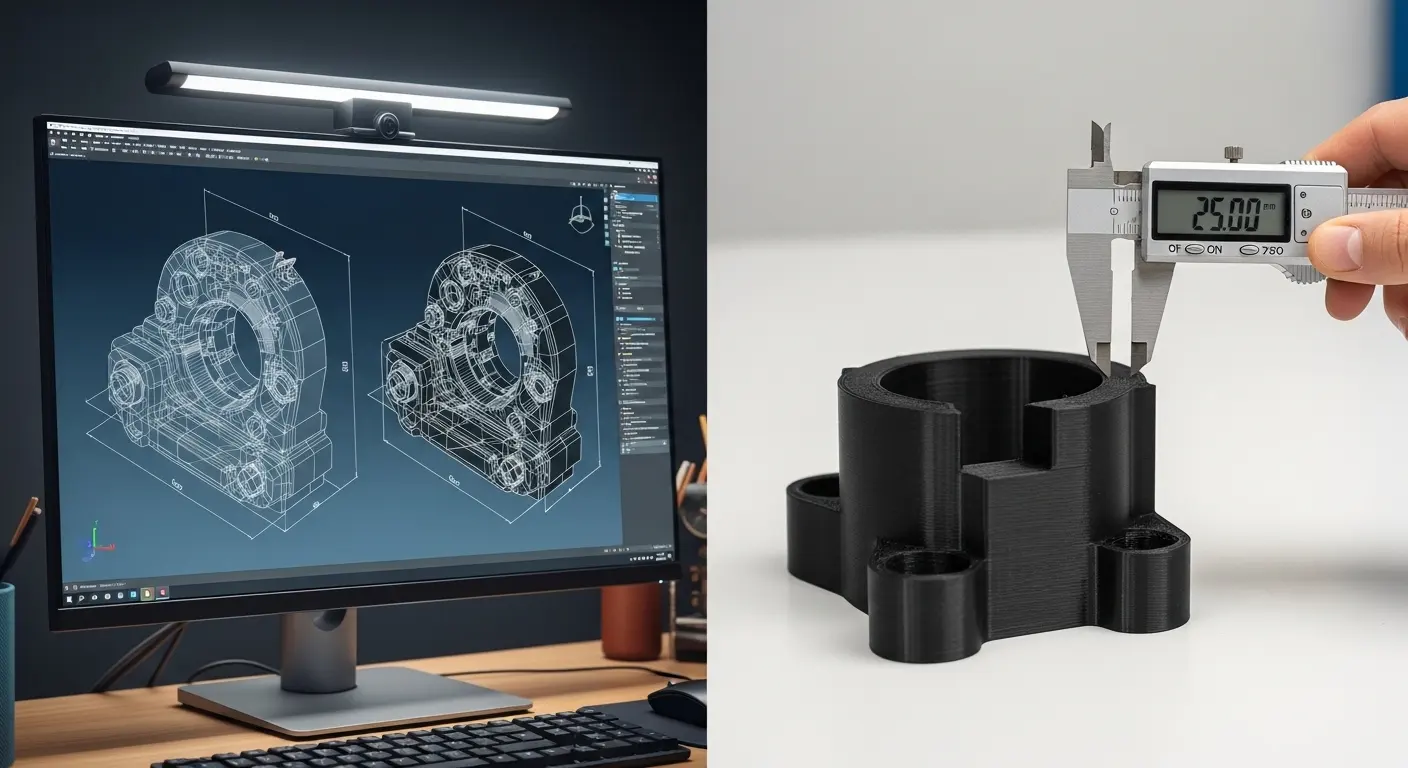
The first step is creating a high-quality 3D CAD (Computer-Aided Design) model that is optimized for additive manufacturing. This digital blueprint defines the geometry, tolerances, and structural integrity of the part. Without a precise 3D model, the printer cannot interpret the layers required to build the physical object accurately.
Many beginners make the mistake of designing for the final product immediately. However, for a prototype, you should design for the specific 3D printing process you intend to use. This means considering wall thickness, overhangs, and support structures. Software like SolidWorks, Autodesk Fusion 360, or Rhino is standard in the industry. Once the design is complete, it must be exported as an STL or STEP file.
| Design Phase | Key Objective | Recommended Software |
| Conceptual | Visualizing form and scale | Blender, SketchUp |
| Engineering | Testing fit and function | SolidWorks, Fusion 360 |
| Optimization | Reducing print time/weight | nTop, Meshmixer |
How do you choose the right material for your prototype?
Choosing the right material depends on whether your prototype is for visual representation, functional testing, or high-heat environments. For basic form checks, PLA or Standard Resin is sufficient. For functional parts requiring durability, nylon (PA12) or ABS-like resins are better. For high-performance needs, consider metal or PEEK.
The material selection phase is where many projects either succeed or stall. If you choose a material that is too brittle for a mechanical test, the prototype will fail, not because the design was bad, but because the material was wrong. We often recommend comparing molding vs 3D printing materials early on. While 3D printing materials have come a long way, they don't always perfectly mimic the properties of final injection-molded plastics like Polypropylene or Polycarbonate.
- PLA (Polylactic Acid): Best for rapid, low-cost visual models.
- SLA Resins: Best for high-detail, smooth surfaces and jewelry or dental prototypes.
- Nylon (SLS): Best for functional parts, living hinges, and durable assemblies.
- TPU: Best for flexible, rubber-like components.
What are the most common 3D printing technologies used for prototyping?
The most common technologies are Fused Deposition Modeling (FDM), Stereolithography (SLA), and Selective Laser Sintering (SLS). FDM is the most affordable for basic shapes; SLA offers the highest surface detail and precision; SLS provides the best structural integrity and does not require support structures, making it ideal for complex assemblies.
Selecting the technology is just as important as the material. If you are working with one of the Top 10 Rapid Prototyping Manufacturers, they will likely guide you toward the process that fits your tolerance requirements. For instance, if you need a prototype that looks like a finished consumer product, SLA is the clear winner because it hides layer lines much better than FDM. Conversely, if you are testing a rugged drone frame, SLS nylon will provide the impact resistance you need.
How can you optimize your CAD files for successful 3D printing?
Optimizing CAD files involves ensuring the model is "watertight," adding fillets to stress points, and orienting the part to minimize support material. You must also account for the "shrinkage factor" inherent in many 3D printing materials to ensure the final physical part matches the intended dimensions within the required tolerances.
One trick we use in professional prototyping is "Hollowing." If your prototype is large and doesn't need to be solid, hollowing out the interior can save significant costs and reduce the risk of warping. However, you must include "drain holes" if you are using SLA or SLS to allow uncured resin or excess powder to escape. Furthermore, always check your wall thickness. A wall that is too thin (less than 0.8mm for FDM) will likely collapse or fail during post-processing.
What is the importance of iterative design in 3D printing?
Iterative design is the process of prototyping, testing, analyzing, and refining a product in repeated cycles. In 3D printing, this allows you to make incremental improvements to a design within hours rather than weeks. This "fail-fast" methodology ensures that the final design is optimized for both performance and manufacturability.
Think of iteration as a conversation between your idea and reality. You might find that the first version of your custom 3D printed prototypes has a button that is too hard to press. Instead of guessing the fix, you can print three versions with different spring tensions overnight. By morning, you have the answer. This rapid feedback loop is why many companies prefer working with established Top 20 Rapid Prototyping Manufacturers who can handle high-volume iterations quickly.
How do you handle post-processing for custom 3D printed prototypes?
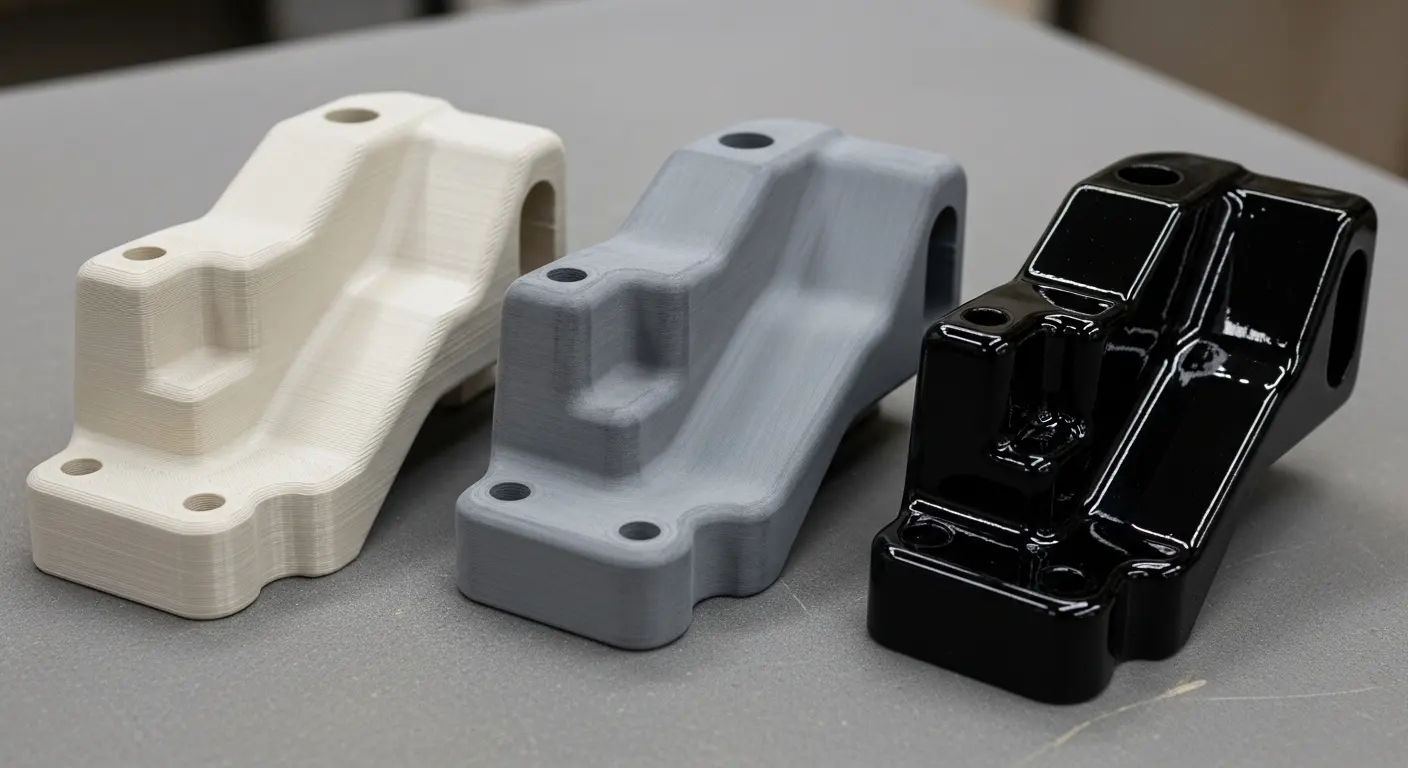
Post-processing involves removing support structures, cleaning the part (with IPA for resin), and performing surface finishes like sanding, painting, or vapor smoothing. For functional parts, post-processing might also include heat treatment or adding threaded inserts. This step transforms a raw print into a professional-looking, "high-fidelity" prototype.
For a prototype to be effective in a board meeting or a user testing session, it needs to look real. Raw FDM prints often have visible lines that scream "unfinished." Vapor smoothing—exposing the part to a solvent mist—can melt those lines away, leaving a glossy finish that looks like injection-molded plastic. If you are aiming for a "Works-Like, Looks-Like" prototype, don't skip the priming and painting stage. A well-painted 3D print is often indistinguishable from a mass-produced part.
When should you transition from 3D printing to injection molding?
You should transition from 3D printing to injection molding when you need more than 100-500 parts, require specific engineering-grade materials not available in 3D printing, or need the surface finish and structural uniformity that only high-pressure molding can provide. This transition usually begins with bridge tooling or low-volume molding.
Many innovators get stuck in "prototyping purgatory," where they keep 3D printing small batches even when it's no longer cost-effective. The "break-even point" is the magic number. If your 3D printing costs per unit are $50, but an injection molded part costs $2 after a $5,000 tool investment, your break-even point is 105 units. Beyond that, injection molding wins. Understanding the nuances of low-volume injection molding can help bridge this gap smoothly.
What are the cost factors involved in custom 3D printing?
The primary cost factors are material volume, print time (driven by layer height), and post-processing labor. Complexity is generally "free" in 3D printing, meaning a complex shape costs the same as a simple block of the same volume, which is a significant advantage over traditional CNC machining.
| Cost Factor | High Cost Drivers | How to Optimize |
| Material | Specialty metals, PEEK | Use PLA for early drafts |
| Volume | Solid, heavy parts | Use infill or hollowing |
| Labor | Manual sanding/painting | Design for "no-support" orientation |
| Technology | Metal SLS or PolyJet | Use FDM for basic geometry |
How do you verify the accuracy of your 3D printed prototype?
Verifying accuracy involves using digital calipers, micrometers, or CMM (Coordinate Measuring Machine) scanners to compare the physical part against the original CAD model. For functional assemblies, accuracy is verified through "fit checks," where the prototype is mated with other components to ensure clearances and tolerances are correct.
In professional environments, we often use "Go/No-Go" gauges. If you are prototyping a casing for a PCB (Printed Circuit Board), the most important verification is the fit of the board and the alignment of the ports. If the prototype is even 0.5mm off, the entire design might need to be adjusted. This is why high-resolution technologies like SLA are preferred for tight-tolerance work.
What common mistakes should you avoid in 3D prototyping?
Common mistakes include ignoring the orientation of the print (which affects strength), neglecting the "XY" and "Z" axis shrinkage, and over-complicating the first version. Many designers also fail to design for the "least common denominator," meaning they create features that are too small for the 3D printer's nozzle or laser to resolve.
Another frequent error is not considering the "staircase effect." Because 3D printing builds in layers, curved surfaces on an incline will have visible steps. If aesthetics are critical, you must either orient those curves vertically or plan for significant sanding. Also, always remember that 3D prints are anisotropic—they are weaker along the layer lines (the Z-axis). If your part needs to take a heavy load, orient it so the layers are perpendicular to the force.
How do you choose a 3D printing partner for custom prototypes?
Choosing a partner requires evaluating their equipment range, material availability, and lead times. A good partner doesn't just "print files"; they provide DFM (Design for Manufacturing) feedback. Look for manufacturers who offer a range of services from 3D printing to low-volume injection molding.
Experience matters. At Sunon Mould, we often see designs that look great on a screen but would fail during the printing process. An expert partner will catch these issues—like a wall that's too thin or a hole that's too close to an edge—before you hit "order." This proactive communication is what separates the Top 10 Rapid Prototyping Manufacturers from a simple online "print farm."
The Role of 3D Printing in Modern Product Life Cycles
Custom 3D printed prototypes have redefined the "waterfall" model of manufacturing. We now live in an era of concurrent engineering. While the marketing team is using a 3D printed "beauty model" for a photo shoot, the engineering team is using a "functional model" to perform drop tests. This parallel processing is only possible because of the speed and accessibility of 3D printing.
As we look toward the future, the line between "prototype" and "end-use part" is blurring. With the advent of industrial-grade materials like Carbon Fiber-filled Nylon and biocompatible resins, some "prototypes" actually end up serving as the final product for low-volume applications. This makes the mastery of the 3D printing workflow even more critical for modern designers.
Advanced Techniques: Multi-Material and Functional Integration
One of the most exciting frontiers in creating custom 3D printed prototypes is multi-material printing. Technologies like PolyJet allow you to print a single part with varying levels of hardness. Imagine a phone case prototype that is rigid in the center but has a soft, rubberized overmold on the edges—all printed in one pass.
This capability allows for "Functional Integration." Instead of assembling five different parts, you can often print them as a single integrated unit. This reduces the number of failure points and simplifies the assembly process later on. However, this requires a deep understanding of CAD and the specific limitations of the multi-material printer being used.
Managing the Prototyping Budget
While 3D printing is cost-effective, costs can spiral if you treat every print like a final product. We recommend a "Tiered Prototyping" strategy:
- Tier 1: Proof of Concept (Low Cost). Use FDM and PLA. Don't worry about color or finish. Focus purely on "Does the idea work?"
- Tier 2: Design Development (Moderate Cost). Use SLA or SLS. Test the fit of internal components. Start refining the ergonomics.
- Tier 3: Final Validation (High Cost). Use high-end materials and professional post-processing. This is the version you show to investors or use for final regulatory testing.
By following this hierarchy, you ensure that you aren't spending "Tier 3" money on a "Tier 1" problem.
Environmental Considerations in 3D Printing
Sustainability is becoming a major factor in manufacturing. Custom 3D printed prototypes are inherently more sustainable than traditional subtractive manufacturing (like CNC machining) because they only use the material required for the part, plus a small amount for supports. Furthermore, many 3D printing materials, such as PLA, are derived from renewable resources like corn starch.
However, it is important to manage waste responsibly. Resin (SLA) waste must be cured before disposal, and support structures should be recycled where facilities exist. Choosing a partner who values efficient material usage can help reduce the environmental footprint of your product development cycle.
Integrating Feedback into the Prototyping Loop
The most valuable part of a prototype is the feedback it generates. When you hold a physical object, you notice things that are invisible on a 2D screen. Maybe a corner is too sharp, or a handle is slightly off-center.
When gathering feedback:
- Be Specific: Ask users to perform a specific task with the prototype.
- Observe: Watch where they struggle. Do they try to open a lid the "wrong" way? That's a design flaw, not a user flaw.
- Document Everything: Every "click," "snap," and "flex" should be recorded so it can be improved in the next iteration.
Scaling from Prototype to Production
Once your custom 3D printed prototypes have been perfected, the next challenge is scaling. This is where you must decide between continuing with 3D printing or moving to molding vs 3D printing for mass production.
If you are producing thousands of units, injection molding is the gold standard for consistency and cost. However, the transition requires a "Design for Manufacturing" (DFM) overhaul. 3D printing allows for undercuts and internal voids that are impossible to mold. You will likely need to tweak your design to include "draft angles" so the part can be ejected from a metal mold.
Final Thoughts on Custom 3D Printed Prototypes
Mastering the creation of custom 3D printed prototypes is a journey of balancing speed, cost, and precision. It is the bridge between a brilliant idea and a successful product in the hands of a customer. By understanding the technologies, materials, and iterative processes involved, you can navigate the complexities of modern manufacturing with confidence.
Remember that a prototype is not a final product; it is a tool for learning. Every failed print is a lesson learned, and every successful iteration is a step toward market dominance. Whether you are working on a simple consumer gadget or a complex industrial component, the principles of professional prototyping remain the same: design with intent, test with rigor, and iterate with speed. By partnering with experts who understand the full spectrum of manufacturing—from the first 3D print to the final injection-molded part—you ensure that your vision becomes a reality.