
Low Volume Mechanical Assembly: Cost-Effective Strategies
Low volume mechanical assembly serves as the vital bridge between a functional prototype and full-scale market penetration. For many manufacturers, jumping straight into mass production is a high-risk gamble that can lead to massive financial losses if the design requires even minor tweaks. By focusing on smaller, controlled runs, you can validate your production process, refine your assembly jigs, and ensure that every unit hitting the shelf meets your brand’s quality standards. This strategic approach minimizes capital risk while maximizing your ability to iterate based on real-world user feedback.
| Strategy Component | Low Volume (100–5,000 units) | High Volume (10,000+ units) |
| Primary Tooling | Aluminum or Soft Tooling | Hardened Steel Molds |
| Assembly Style | Skilled Manual Labor | High-Speed Automation |
| Design Flexibility | High (Easy to modify) | Low (Fixed for efficiency) |
| Market Entry | Fast (2-4 weeks) | Slow (3-6 months) |
| Financial Risk | Low Initial Investment | High Upfront CAPEX |
| Unit Consistency | High (via 100% Inspection) | High (via Automation) |
What is Low Volume Mechanical Assembly and Why is it Essential?
Low volume mechanical assembly is the process of producing and putting together products in quantities ranging from a few hundred to several thousand units. It is essential for high-value niche products, medical devices, and "bridge manufacturing" while waiting for mass-production tools. This method allows for high-precision builds without the prohibitive costs of automated assembly lines.
In my experience, the "bridge" phase is where the most critical product improvements happen. During a mechanical assembly run of just 500 units, you might discover that a specific fastener is prone to stripping or that a wire harness is too short for easy installation. Catching these issues now costs pennies; catching them during a 50,000-unit run can cost a fortune in recalls and reputation damage.
Furthermore, low-volume runs allow you to serve specialized markets that don't require millions of units. It keeps your inventory lean and your overhead low, which is the cornerstone of a "Lean Manufacturing" philosophy.
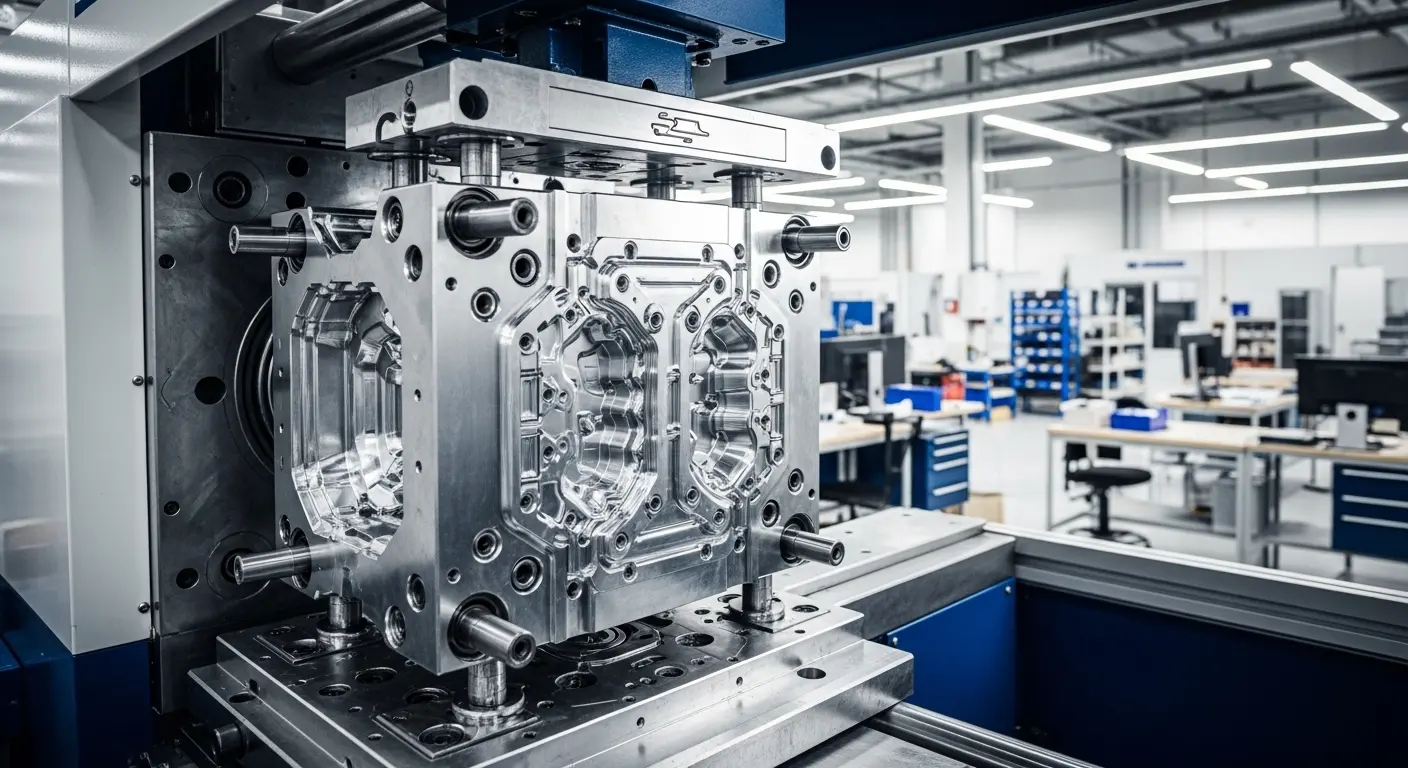
How Can You Reduce Tooling Costs for Small Batches?
To reduce tooling costs, utilize aluminum molds or 3D-printed inserts instead of traditional hardened steel. These "soft" tooling options are faster to produce and significantly cheaper, often saving up to 50% on initial costs. Additionally, designing modular components allows you to use a single mold for multiple product variants, spreading the cost across different SKUs.
Tooling is the "barrier to entry" for many innovative products. If you are developing a product that requires a 2k injection mould, the complexity can drive costs up quickly. However, by using aluminum for low-volume runs, you get the same precision as steel with a much lower price tag and faster cooling times, which speeds up the molding cycle.
Tip: Ask your manufacturing partner about "Master Unit Die" (MUD) systems. This allows you to only pay for the custom cavity of your part rather than the entire mold base structure.
Does Design for Manufacturing (DFM) Change for Low Volume?

Yes, DFM for low volume emphasizes "Ease of Assembly" for humans rather than "Ease of Feeding" for robots. This means using larger, easy-to-handle fasteners, self-aligning features (poka-yoke), and minimizing the total number of parts. When assembly is manual, the goal is to reduce the cognitive load and physical strain on the technician.
When we analyze a design for low-volume production, we look for "bottlenecks." If a technician has to spend three minutes fiddling with a tiny clip, that’s a cost center. By redesigning that clip to be a molded-in snap-fit, we can cut assembly time by 40%.
- Symmetry: Design parts so they can be installed in multiple orientations.
- Access: Ensure there is enough "elbow room" for hand tools to reach every screw.
- Commonality: Use the same screw size across the entire assembly to avoid tool changes.
Why Should You Integrate Post-Processing Early?
Integrating post-processing into your low-volume workflow ensures that your products have a premium look and feel from day one. Techniques like laser etching, custom painting, or EMI shielding can be applied to small batches to meet specific regulatory or branding requirements. This allows you to compete with larger brands on aesthetic quality without needing their massive production budgets.
Often, the "raw" part from the mold isn't enough to satisfy high-end customers. Effective post-processing is what bridges that gap. For a low-volume run, you can use specialized manual finishing techniques—like hand-polishing or custom spray coating—that would be too expensive to scale to millions but are perfectly viable for a few thousand units.
How Do You Manage Supply Chain Risks in Low Volume?
Manage supply chain risks by sourcing standard, "off-the-shelf" components whenever possible and maintaining a list of alternative vendors for custom parts. Since low-volume orders have less leverage with giant suppliers, building strong relationships with boutique, mid-sized manufacturers is key to ensuring consistent part delivery and quality.
The biggest threat to a small-batch run is the "Single Point of Failure." If your specialized sensor comes from only one factory in the world and they have a delay, your entire assembly stops.
- Buffer Stock: Keep 10% more hardware and components than you think you need.
- Local Partners: Use local suppliers for your most complex parts to reduce shipping times and communication barriers.
- Material Substitutions: Have a pre-approved list of alternative plastics or metals in case of material shortages.
Should You Outsource or In-House Your Small Batch Assembly?
Outsourcing is usually the smarter move for low volume because it gives you access to professional-grade cleanrooms, specialized jigs, and experienced labor without the fixed overhead. A contract manufacturer can pivot their staff to your project for two weeks and then move them elsewhere, whereas in-house staff must be paid regardless of the production schedule.
Managing an in-house assembly line is a full-time job. Between hiring, training, and maintaining equipment, it can distract your team from their core mission: innovation. By partnering with a firm that understands the nuances of custom overmolding service and mechanical integration, you get a "Turnkey" result that is ready for shipping.
Tip: When choosing an outsourcing partner, look for one that handles both the part manufacturing and the assembly. This "One-Stop-Shop" approach eliminates Finger-Pointing if a part doesn't fit correctly during assembly.
What Quality Control Measures are Vital for Small Runs?
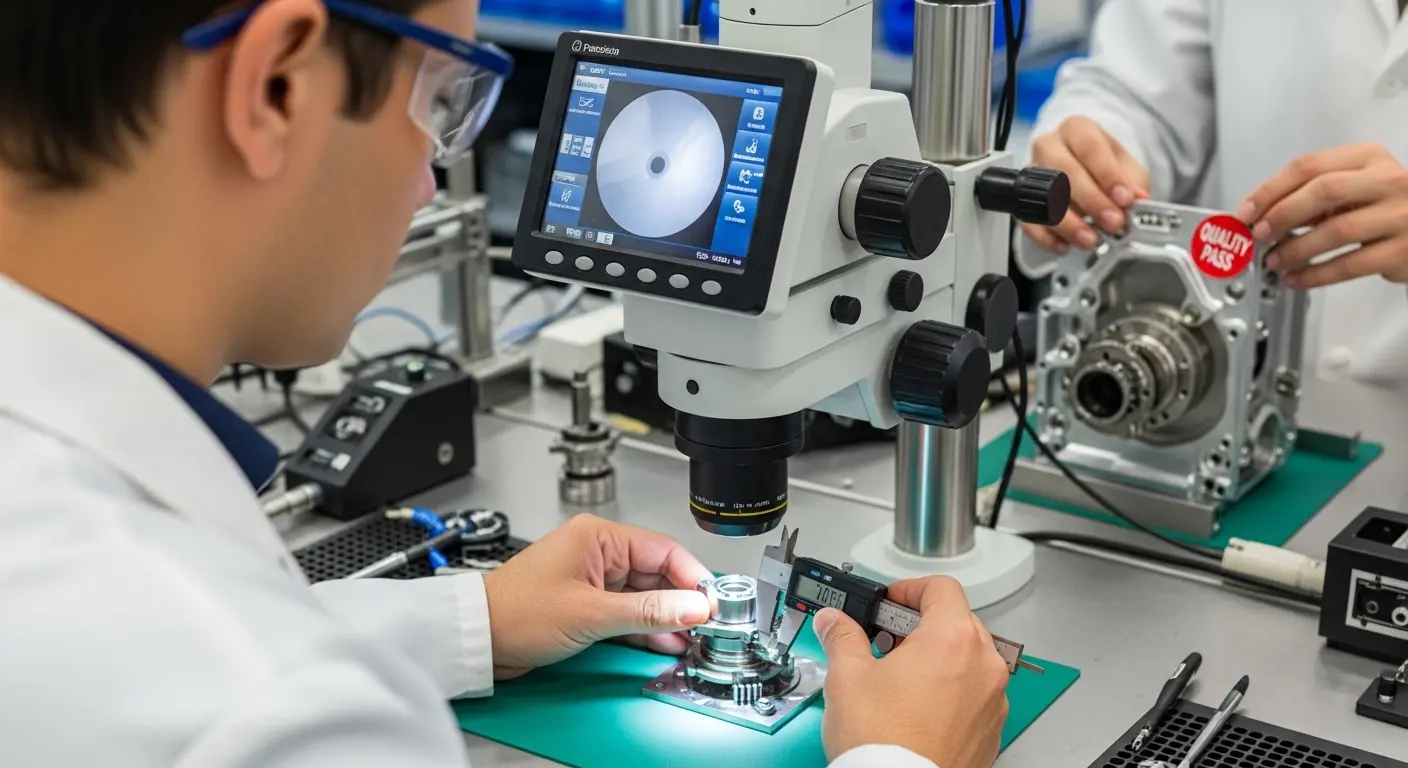
For low-volume runs, 100% inspection is the gold standard, as the total quantity allows for every unit to be personally checked. Vital measures include functional testing, cosmetic audits, and the use of precision "Go/No-Go" gauges. These steps ensure that every product leaving the facility is defect-free, protecting your brand during its most vulnerable growth phase.
In mass production, you might only check 1 out of every 100 parts. In low volume, that’s too risky.
- First Article Inspection (FAI): Every dimension of the first part is verified against the blueprint.
- Functional Testing: Every device is powered on and its core functions are tested.
- Final Cosmetic Audit: A trained eye checks for scratches, gate marks, or color variations under standardized lighting.
How Do You Optimize Labor Costs for Manual Assembly?
Optimize labor costs by creating "Cellular Manufacturing" layouts where one technician can complete several steps in a logical flow. Using 3D-printed assembly jigs and clear, visual work instructions reduces the learning curve and prevents errors. Efficiency in manual assembly isn't about working faster; it's about working smarter by eliminating wasted movement.
Labor is the highest variable cost in [low volume mechanical assembly]. If a worker has to walk across the room to get a part, you are losing money. A well-designed "U-shaped" cell puts every tool and component within arm's reach.
Can 3D Printing Replace Molding for Low Volume?
3D printing can replace molding for quantities under 100-200 units, but it typically loses its cost advantage once you hit the 500-unit mark. While printing eliminates tooling costs, the "per-unit" cost remains high and the surface finish often requires more post-processing. A hybrid approach—using 3D printing for complex internal brackets and molding for external shells—is often the most efficient.
How to Prepare for the Scale-Up to Mass Production?
Prepare for scaling by documenting every "fix" or "workaround" discovered during the low-volume run. Use these insights to refine your Design for Manufacturing (DFM) and begin shopping for hardened steel tooling. The data you gather now—on assembly times, failure rates, and material performance—will be the foundation of your high-volume success.
- Standardize: Lock in your BOM (Bill of Materials) so no changes occur during the transition.
- Automate Slowly: Identify the single most repetitive task and plan for a robot to take it over in the next phase.
- Audit: Ensure your suppliers can scale their quality control as their volume increases.
Final Thoughts: The Low Volume Strategic Advantage
Mastering low volume mechanical assembly gives your business a level of agility that "Big Tech" often lacks. It allows you to launch faster, fail cheaper, and iterate more intelligently. By leveraging cost-effective tooling, prioritizing human-centric design, and partnering with versatile manufacturers, you can produce world-class products on a startup budget.
The key is to treat low-volume production as a learning laboratory. Every unit assembled is an opportunity to refine your product and your process. When you finally do decide to scale, you won’t be guessing—you’ll be executing a proven plan.